

- The undo button is your best friend. You can find it in the header of the page, as shown below. CTRL+Z also works in Canva. If at any time you make a mistake, simply undo it and continue onwards.

- Everything auto saves. You don’t have to worry about saving your project, as Canva automatically saves everything you’re working on.
- You do not need Canva Pro for any part of this project. All of the tools used in this project are available on the free version of Canva.
- All frames and text boxes are prepositioned, presized, and preformatted to fit your needs. You should not need to move, resize, or edit any of the existing frames or text boxes.
- Use a separate “design” (file) for each rack card you make. Canva uses the word “design” for individual files. On your account, you can have a near infinite number of “designs” (files). You can make multiple copies of the provided template and have a separate “design” for each invasive plant you’re focusing on. This will allow you go back and edit any cards you’ve already made without having to completely redo them.
- Copying and pasting text will not also copy text formatting. You can copy and paste text from any website or existing document and the original formatting will not carry over to the rack card. All pasted text will take on the font, size, and color of the text box it’s being pasted in to.
- You can use the arrow keys on your keyboard. For precision adjustment, you can click on whatever item you’re trying to move and use your arrow keys to make smaller, more accurate movements
Once you have the template open, in the upper left hand corner of the page, click “File”, then “Make a copy.”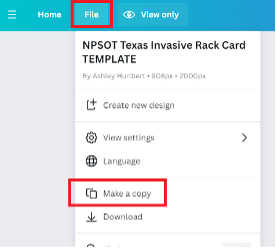
This will make save a design to your Canva account titled ”Copy of NPSOT Texas Invasive Rack Card TEMPLATE”.
When you copy the template, it saves to your Canva account as ”Copy of NPSOT Texas Invasive Rack Card TEMPLATE”.
To rename your template, click on the name of the template at the top of the page to access the title textbox. This is highlighted below.
You can type in whatever name you prefer. It is suggested to name your file the name of the invasive plant you’re making the rack card for. This will auto save once you hit the enter button on your keyboard or click away to something else on the page.
If you find that the name or descriptive text is too large to fit in the allotted space, you can decrease the size of the text by single clicking on the textbox and using the “Decrease font size” (the minus size) button highlighted below.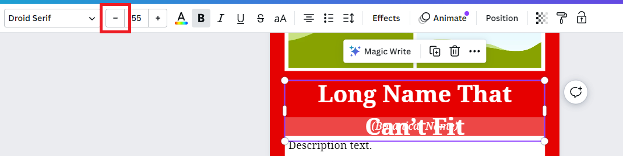
Please make sure that before using photos on your rack card that you have the express permission of the owner of the photos to use it for this purpose. Do not use any photo found on the internet unless you have permission from the photo’s owner to use their property for this project. If you use pictures from the native plant database, you do not need additional permission if NPSOT is the source in the photo credits. If you use pictures from the invasive plant database, most will not require additional permission. However, for any picture that was permissioned from Bugwood (check the picture’s photo credit), you will need to send in Bugwood’s permission request form. It’s a simple online form and since you will be requesting for a free educational purpose, you should receive a response immediately or within hours. Here is the link to the Bugwood permission process.
In order to use your photos, you will have to upload your photos into Canva. To do this, you will go to the sidebar and click on the “Uploads” button, then on the “Upload files” button. Both are highlighted below.
From there, go to the folder where you have your photos saved on your computer. Select all the photos you wish to upload. You can select multiple photos at one time by holding the Control key while you select them. Once you have your photos selected, click “Open” and your photos will upload into Canva.
Alternatively, you can drag and drop your photos from their location on your computer into the side bar.
When uploading photos, Canva will save your photos in the order they are uploaded. The most recently uploaded photos will be at the top of the Uploads page. Once your photos have uploaded, you will see them in the “Uploads” side bar as shown below. 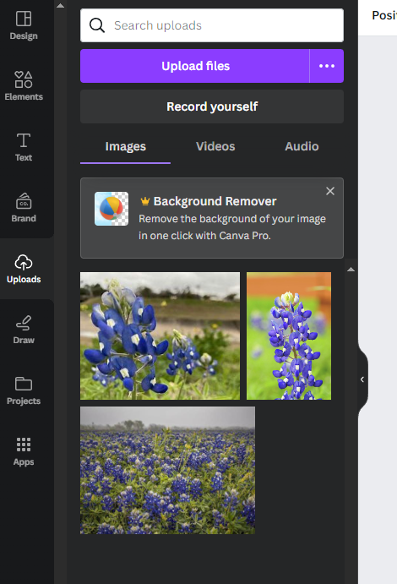


Once your photo is placed into the frame, Canva may cut off part of the image you wish to show, like trying to put a 5”x7” photo in a 4”x6” frame. To edit what portion of your uploaded photo is displayed in the frame, double click on the photo. It should now resemble the example below. 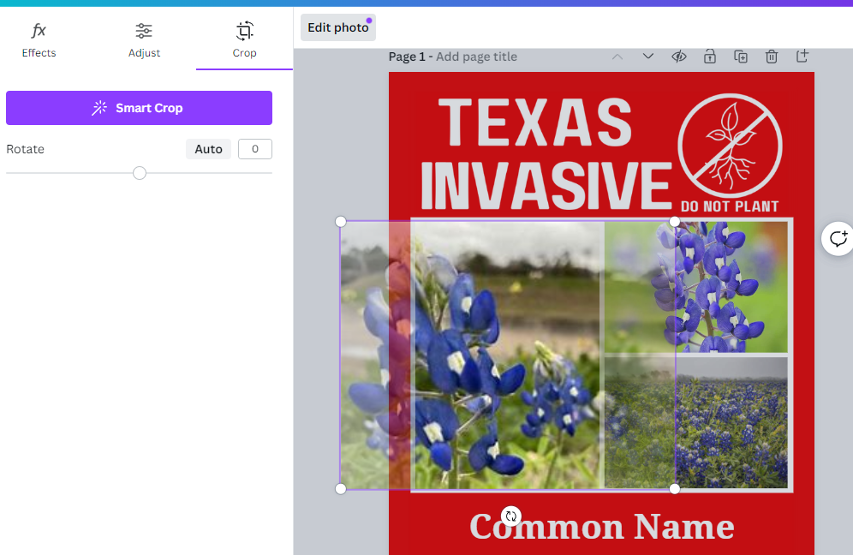
From here you can drag the photo around until you have the image displayed to your preference.
You can also use the resizing handles (highlighted below) to zoom in on the photo if you need additional assistance in focusing the image. Just drag the white circles around until your image is sized correct, then adjust placement until it fits your preferences. 
In order to add QR codes to the template, you will first need the link to the listing of your plant in the NPSOT Native Plant Database, located here: Native Plant Database
Using the search bar on the database, search for the name of the native place you’re wishing to feature. Once you’ve located the native plant, go to its page. Copy the URL of the native plant’s entry in the database. Your link should look something like this: https://npsot.org/posts/native-plant/acmella-oppositifolia-var-repens/
Once you have the link to the database entry to your native plant, you will go to the “Apps” button in your side bar. Using the search bar in the side bar, search “QR”. Click on the “QR Code” button to access the QR Code application. 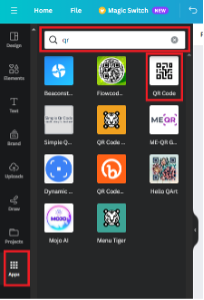
Enter your native plant’s URL in the URL box and click “Generate code.” 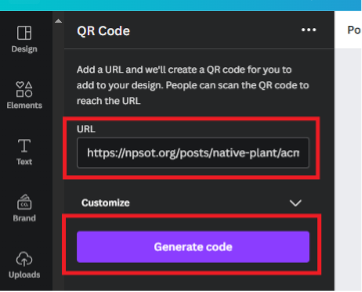
A QR code will generate in the middle of your project and look something like this. 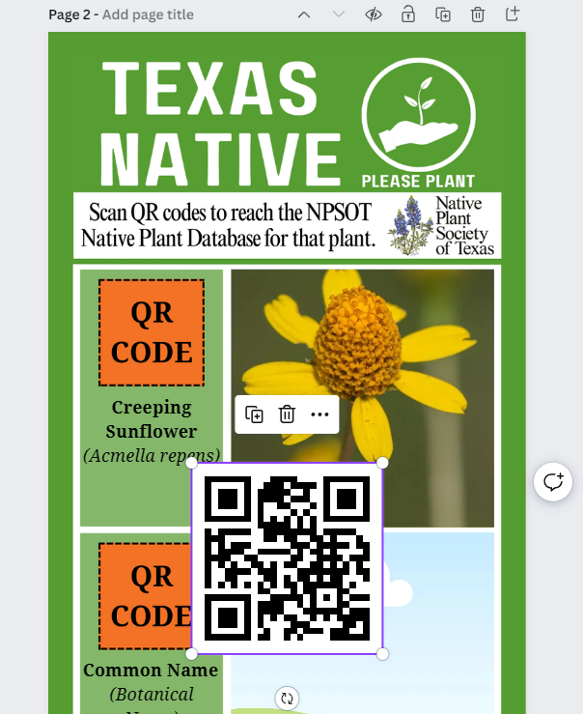
Drag the QR code so it lines up with the box above the name of your native plant, then resize so it covers the orange QR placeholder perfectly, as shown below. You have now successfully placed your QR code. Anyone with a smartphone will be able to scan the QR code to access the native plant’s database entry. 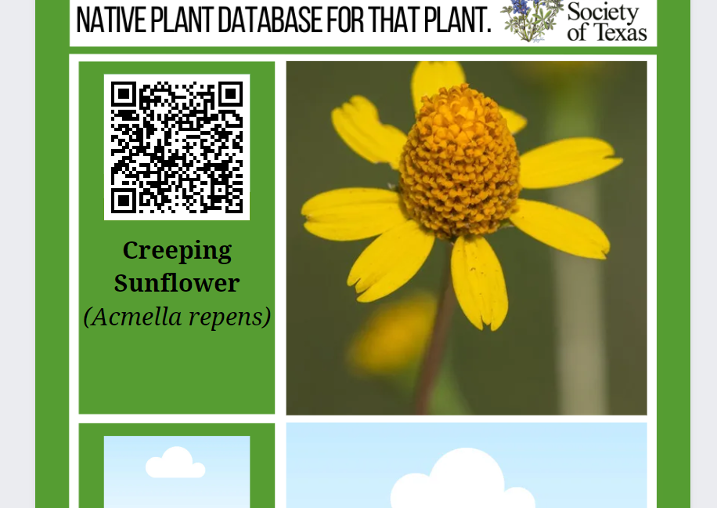
You will use the same instructions for your invasive plant. Visit the NPSOT Invasive plant database here: NPSOT Invasive Plant Database.
Then search for your chosen invasive plant and copy the URL of that specific entry. Your link should look something like this: https://npsot.org/posts/invasive-plant/lonicera-maachii/.
Once you have your link, follow the same instructions above for creating and placing your QR code.
Once all your text boxes and frames are filled and QR codes have been placed, you can save your rack card to your computer to share.
Click on the “Share” button on the upper right-hand corner of the page, circled below. 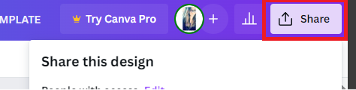
To download the file of your rack card to your computer, click the “download” button, circled below. 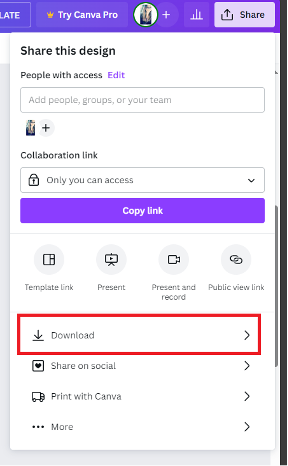
Using the “File type” dropdown menu, select which file type you prefer. It is highly recommend to use PDF Standard so changes can’t be made to the finished file.
As Canva is primarily used for graphic design projects, a blue “suggested” banner will automatically appear next to the PNG file type. This is NOT the suggested file type for this project. 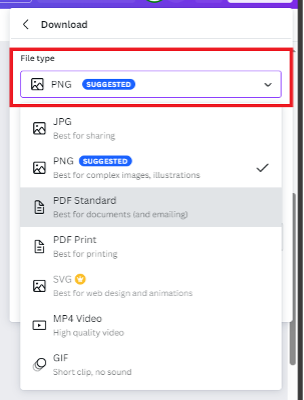
Once you have your file type selected, you shouldn’t need to change any of the other settings. Click on the “Download” button, highlighted below. 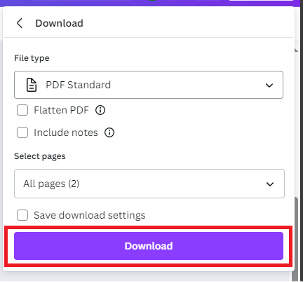
You should now have a copy of your rack card available in your downloads folder on your computer. The name of the file will be the same name as the design (which should be the name of your invasive species) in Canva.